
Everywhere you look these days, people are making, buying, and using beeswax food wraps. If the concept is new to you, beeswax food wraps are pieces of beeswax-infused cotton fabric that can be used in place of plastic or aluminum food wrap.
Table of contents
Since they are reusable, beeswax wraps present a sustainable alternative to all the single-use wraps that go into landfills or oceans. Like many other environmentally aware folks, I would love to reduce my plastic footprint. And since I have plenty of beeswax lying around with nothing to do, I decided to give it a try.
A long way from perfect
After using my beeswax wraps for a short while, I’ve concluded that they are much more than just a food covering. Instead, they are a lifestyle choice. Owning a beeswax food wrap is like raising a child; you must be prepared for sticky fingers, smears, odd odors, and a whole lot of maintenance. They are hard to clean — hot water is out of the question — and they don’t work for everything. In fact, nearly every time I go to cover something, the wraps don’t seem like the right choice.
I made a chocolate cream pie for Christmas, light and ethereal, piled high with whipped cream. A heavy cotton wrap would have squished it into a s’more. A plate of holiday cookies loses its appeal under a dark wrap that hides the festive appearance. And in the fridge, you can’t see what’s in all those bowls and pans. I was opening and reopening so often I thought of not covering them at all.
Still, the environment is important to me so I’m happy with using the wraps now and then for some things. If you think of them as an occasional use item instead of a daily staple, you will be happier. I think.
Trying to simplify the process
I started my quest by reading dozens of recipes. In nearly all cases, the ingredient list was the same as the list on the commercially-available wraps. The recipes varied slightly in proportions, but the directions on how to make the wraps ranged from very easy to exceedingly complex. I tried to take the best ideas from each set of instructions, considered alternatives, and feared the process would take forever.
I hate cleaning up messes, so by tweaking all the potentially messy steps, I finally came up with a system that is drop-dead easy with little aftermath. With my tools and ingredients assembled, I was able to make three medium-sized wraps in about ten minutes and clean-up was a breeze.
Understanding the ingredients
The first thing I had to decipher was the ingredients list. Okay, I understand 100% cotton fabric and I understand beeswax, but when it came to pine rosin and jojoba oil, I had questions. What is pine rosin and do I really want to wrap food in it? Why jojoba oil and not some other kind of oil? Why did I even need oil?
Right from the get-go, I learned that other people have asked the same questions, and quite a few decided to just leave those ingredients out. But by leaving something out, you quickly learn why you should leave it in. Like oil in your crankcase, it’s best to have it there.
Rosin vs resin in beeswax food wraps
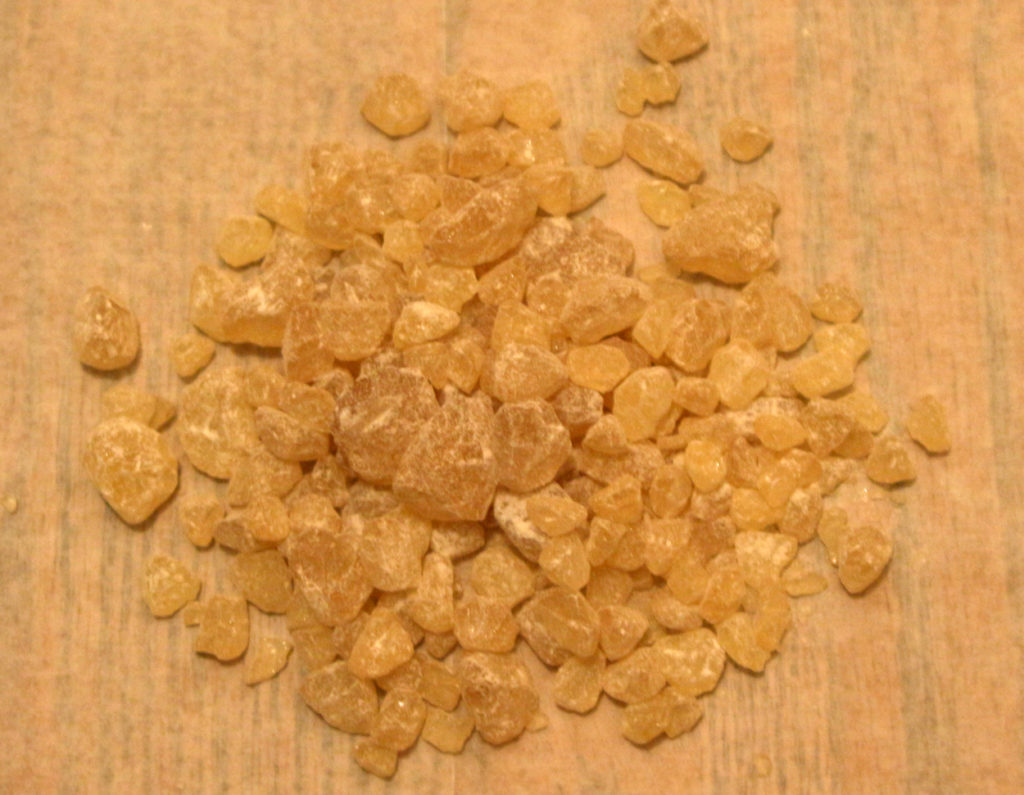
You will notice that some recipes call for pine resin and others pine rosin. The difference, I discovered, is that rosin is the solid form of resin that comes from pine trees and some other conifers. To make rosin, liquid resin is heated to drive off the volatile compounds, the compounds that are not good for humans to consume or inhale. So remember, it’s rosin you want, not resin.
I checked the Material Safety Data Sheet (MSDS) for pine rosin and it looks innocuous, although it can cause an allergic reaction in some people. The MSDS lists no exposure limits, and rosin is not marked as a carcinogen, not even in California. To me, it smells faintly woody with no hint of turpentine.
Most commonly, rosin is crushed into powder and used as an anti-slip agent. It is used by ballet dancers, gymnasts, bowlers, weight lifters, rock climbers, bull riders, baseball players, drag racers, and pole dancers. It can be used whenever you want to get a good non-slip grip on something.
Rosin makes the wraps cling
In your beeswax wraps, the rosin is what makes the fabric cling onto bowls, plates, and itself. It’s the ingredient that makes it stick. If you omit the rosin, the wraps may come loose from the containers, allowing air to enter and water to leave — not what you want for food storage.
I ended up ordering a one-pound bag of pine rosin from Amazon. It comes as a bag of little rocks that look like amber, which is essentially what it is. A pound is a lot. Since I used only 0.7 ounces to make three wraps, one bag will probably last me a lifetime, unless I take up pole dancing.
Jojoba oil
Jojoba oil comes from the seeds of Simmondsia chinensis, a shrub native to the southern parts of California and Arizona. Apparently, jojoba has a long shelf life compared to similar vegetable oils and it has natural antibiotic properties, making it the first choice. The runner-up in popularity was coconut oil, so either would work.
I purchased a four-ounce bottle of organic jojoba oil and used one tablespoon in my recipe. Vegetable oil keeps the wraps pliable so they don’t crack when you fold them over a container. My sample has a slightly oily scent, similar to other vegetable-derived oils.
Beeswax
The beeswax you use should be clean and filtered, free of bee parts and hive debris. You can use either white wax or yellow. Darker wax can interfere with fabric designs, but since any beeswax may darken when heated, it doesn’t make much difference. For quicker melting, you can shave or chop the wax in advance, but for the amount you need, it’s not necessary.
Cotton fabric
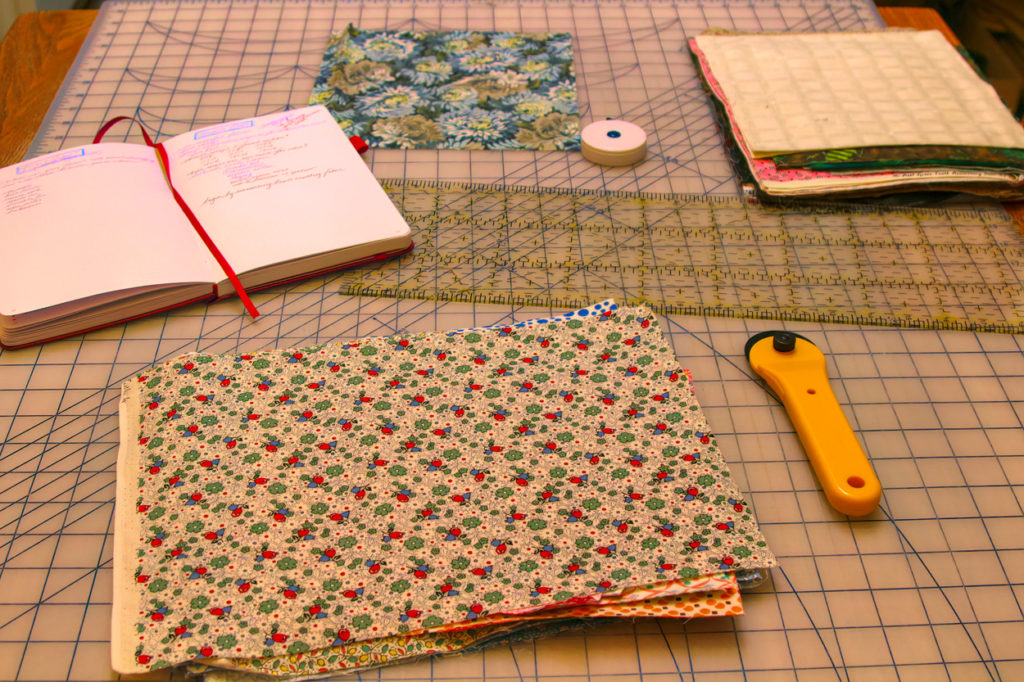
Some people like to use organic, non-printed fabric while other folks like to use colorful prints with a down-homey look. In either case, stick with 100% cotton fabric and remember to pre-wash the fabric to remove the sizing.
Sizing is a material added to the threads during the manufacturing of cloth. It makes weaving easier and makes the resultant fabric easier to cut and handle. The sizing added to cotton fabric washes out easily, but you want to make sure it’s gone before you make the wraps. If left in place, sizing can keep the beeswax mixture from properly soaking into the cotton.
Machine washing is okay, but not necessary. I just washed the squares in a dishpan of soapy water and rinsed them well. Once dry, you’ll want to iron them so they lay flat on your sheet pan or cookie sheet.
Choosing the dimensions
Before you cut the cotton, you need to decide on the sizes of wraps you need. After checking through dozens of retail sites, I found the most common sizes, in inches, were small (7×8, 7×9, or 8×8), medium (10×11, 11×11, or 10×13), and large (13×13, 13×14, or 14×14).
So far, I haven’t had a use for the small one. Some people say the small ones are good for wrapping a partial onion or avocado. But here’s the thing. Many people who wrapped an onion said they couldn’t remove the smell from the wrap. Ever. The avocado people were divided into two camps: One half said they never had an avocado store as well and oxidize less than when they used a beeswax wrap. The other half said they never had an avocado come out worse — and disgusting. So, you might want to consider that before deciding on sizes.
I simply measured some of my favorite food storage containers and added four inches to each dimension, which yields two inches of overhang on each side. The limiting factor, I discovered, was the largest size didn’t lay flat on my sheet pan. So consider that, too, or get a bigger pan. Another option is making circular ones to fit a bowl or container, adding maybe four inches to the diameter.
Cutting the cotton
It’s easier to cut the cotton before you wash out the sizing, but you can do it either way. Many people suggest using pinking shears to reduce frayed edges. I thought about it but decided that the wax coating would prevent fraying. As soon as the wraps dry and harden, you can cut away any loose threads.
Other equipment
Before you begin, you will need to assemble some equipment, all of which you probably have around the house. Most beekeepers have worked with beeswax enough to know how messy it can be, so be sure to use dedicated utensils and thoroughly protect your kitchen from the wax.
- Grater (for beeswax) optional
- Mortar and pestle (for rosin) optional
- Measuring spoons
- Kitchen scale
- Double boiler (or a dedicated wax container in a pan of hot water)
- A half-sheet cake pan or cookie sheet
- Aluminum foil or parchment
- Chip brush or another cheap paintbrush (steal from your partner, don’t tell)
- Stir stick (a wide craft stick works well)
The recipe
This is exactly how I made my first batch of wraps, after having prepared and cut the cotton.
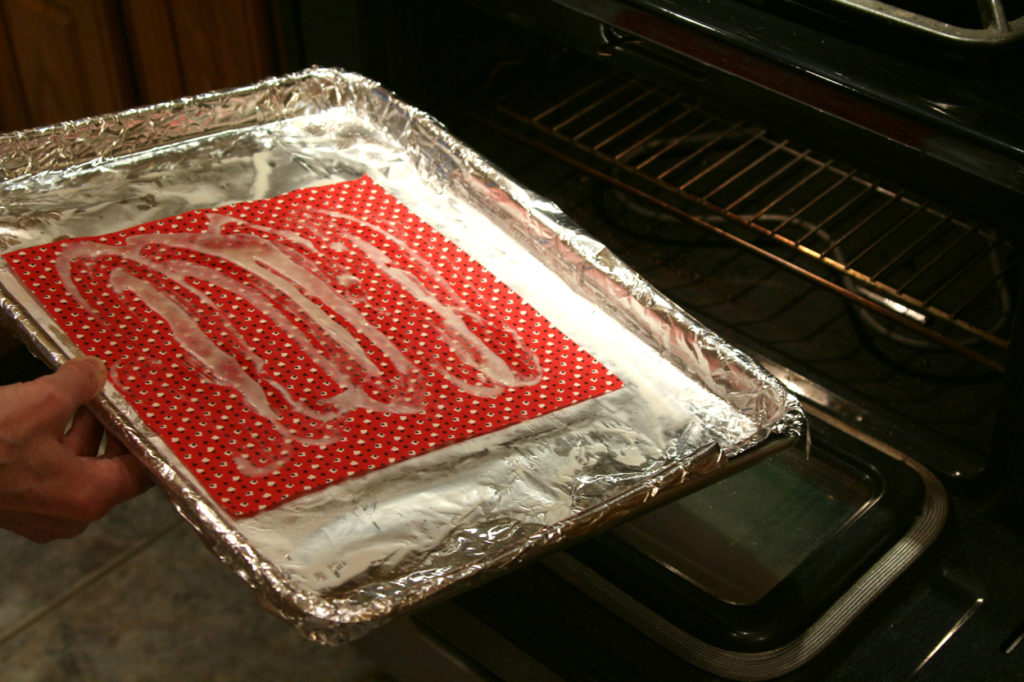
Step 1: Line your sheet pan or cookie sheet with aluminum foil. I thought this was ironic, seeing as how the purpose of these wraps is to limit the use of such products. Still, if you don’t want to ruin your pan, you need to line it with something.

Step 2: Preheat your oven to 200 F.
Step 3: Mix together and place in a double boiler the following ingredients:
- 3.5 ounces of clean beeswax (chopped, if desired)
- 0.7 ounces pine rosin (pulverized, if desired)
Stir occasionally. After the first two are completely melted add:
- 1 tablespoon jojoba oil, stir to combine
Note that I didn’t use a double boiler but put the ingredients in a small mason jar and set the jar in a pan of gently boiling water. There’s a chance of breaking the jar using this method, especially on an electric stove, so a double boiler would be safer. Also, I didn’t chop or pulverize, but the ingredients melted quickly just the same.

Step 4: Place your first fabric piece on the lined pan, smoothing it out. Using oven mitts, carefully remove the jar from the boiling water, and gently pour a small stream of mixture onto the fabric. I went back and forth in a snakelike pattern, using about a quarter of the mixture. Don’t use too much because you don’t want a thick layer, just a thin one. Return the jar to the hot water.

The wax will harden instantly, way before you can spread it out with the stolen brush. That’s okay. Just put the pan in the oven for about five minutes. When you take it out, most of the wax will have dispersed into the fabric. If some areas are still dry, just take the brush and swish the hot wax around until the entire cloth is covered. Check the back, too. If any areas need more, just add a bit from the jar.
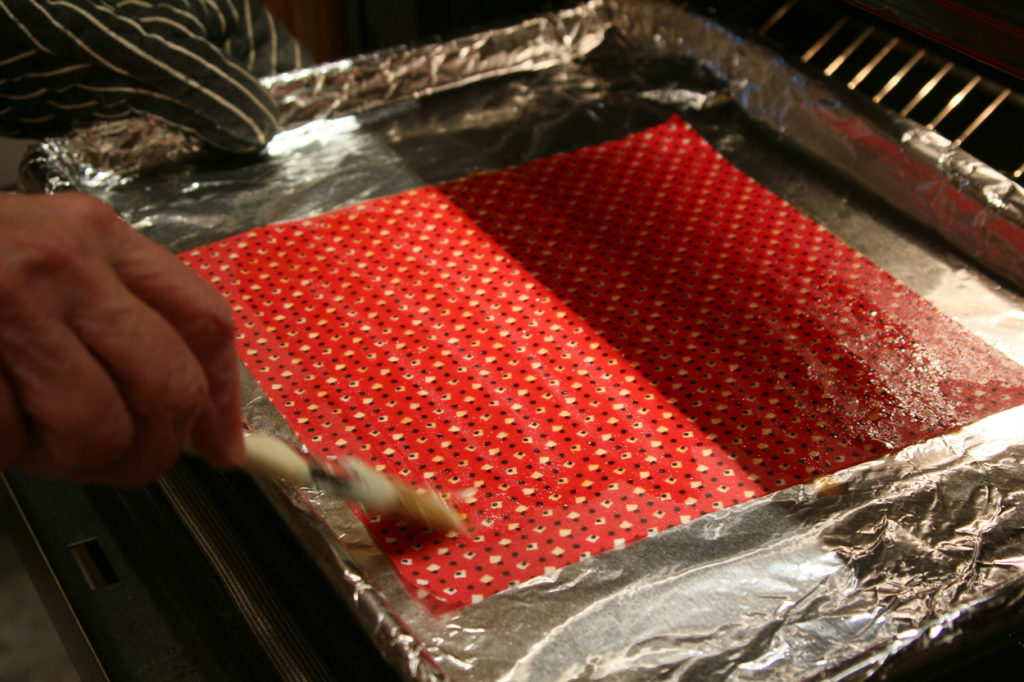
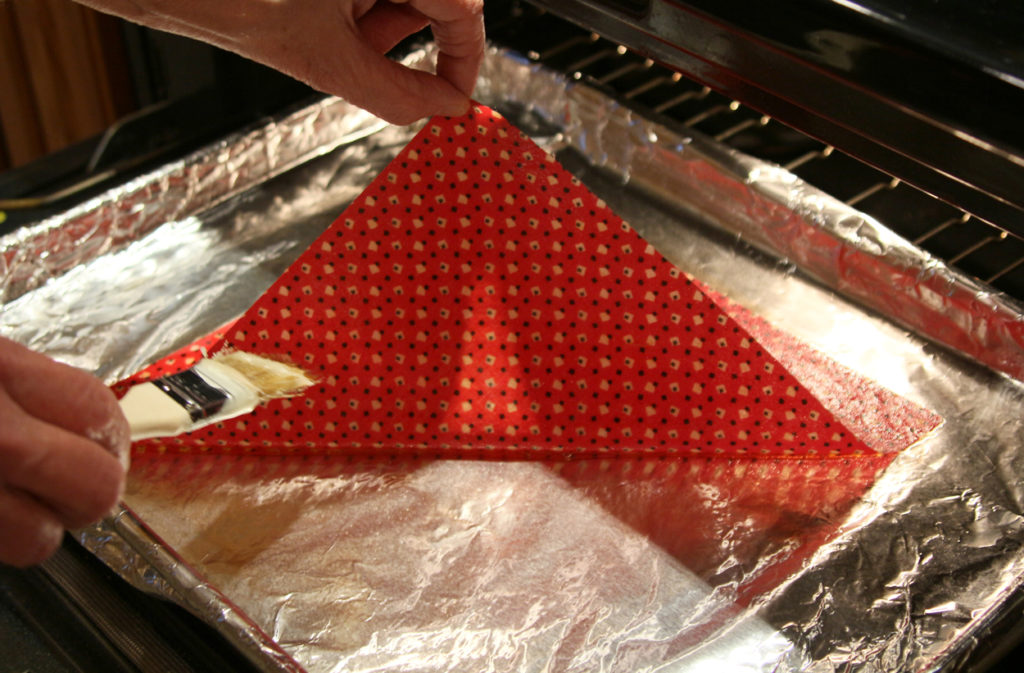
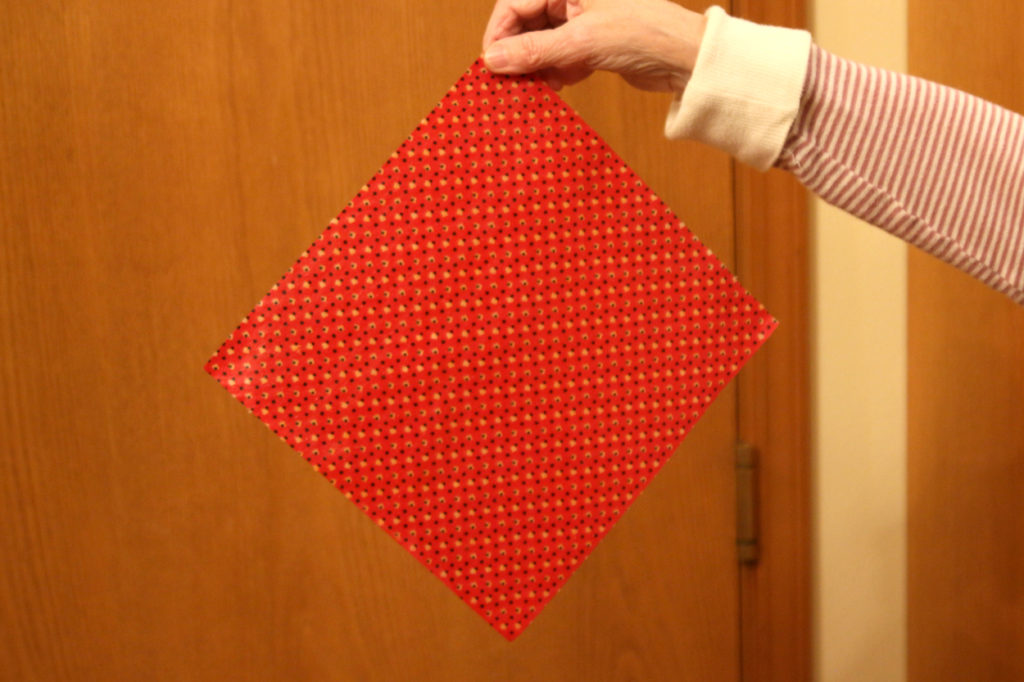
Step 5: As soon as all the areas are covered, remove the wrap from the pan and wave it around for a minute or so. “Waving around” was something I was advised to do, but I didn’t understand. It’s correct, though. Once I waved it, it cooled and hardened in a flash.
Step 6: Repeat as necessary, one fabric piece at a time. Although the first wrap takes about five minutes, once the pan is hot, successive wraps take only about two minutes each. It would be easy to pre-heat the pan but hardly worth it.
When you’re done, you can simply put a lid on your mason jar and save the remaining mix for next time. I saved the aluminum foil and the stolen brush, as well. Finally, any beeswax splatters can be removed with alcohol. I know this is a lot of words, but the entire process was very easy. Scout’s honor.
Using your new beeswax food wraps
To use your new wraps, lay them over the container you wish to cover and use your hands to warm the wraps slightly. With a little heat, the wraps will soften and grip the sides of your container. It takes some practice, but soon you will get them to adhere in a tight, form-fitting way.
You can use the wraps to cover bowls, cups, plates, and serving dishes. Some folks use them to save sandwiches or snack foods, or you can give that avocado thing a try. They should not be used for meat because they are difficult to clean. When not in use, you can store them folded or rolled in a drawer or cabinet.
Remember, do not expose your wraps to heat. That means no hot water, no microwave, and no washing machine. It’s best to run them under cool water, wipe them with a soapy cloth, rinse, and hang them to dry. The wraps do have a slight odor — beeswax mostly — but I haven’t detected any transfer to the food.
According to regular users, beeswax food wraps will last a year with minimal care. However, if they begin to lose their flexibility or stickiness, you can use your tray and pop them in the oven to melt and redistribute the wax or, if necessary, you can add a bit more mixture. Nothing to it . . . and that’s a wrap!
Rusty
Honey Bee Suite

Note: This post contains affiliate links.


Pole dancing. I noted the first use of the term, laughed, then completely died at your second reference! I have gained more than I even know from years of reading your generous writing, and your wit slays me. Thank you!
Hi Rusty.
We’ve made a number of these after being shown how at one of our beekeeper’s association meetings. However, I would like to pass on to you all a route that is a bit easier, quicker, and allows you to make them without having to pop the tray into the oven. I went to the big box store we all know and hate, and purchased for my wife a less than 20 dollar rectangular electric fry pan. She then proceeded to lay one out and coat it, then placed another on top which soaked up any excess wax mixture. Also, any dryer spots received additional wax, but the bottom wrap kept everything coming as wet as needed. She was able to put up close to 20 of these in about as many minutes. Lastly, after they are coated, and still slightly sticky, she was able to “hang” them on the edge of the cupboard until needed. Hope this little tidbit helps. Bee safe, bee well. Don
Hey Rusty,
Could you use propolis instead of rosin?
Kate,
You can try anything you like. Personally, I find propolis to be very sticky. Still, it might work.
I had no idea rosin had all these other uses. For me, it is the little block you draw back and fore over the bow hairs so that they stick or drag on the strings of your violin, cello etc.
Enjoyed this post very much. I won’t be making wraps for myself because I have a friend who keeps me supplied. And she too has very little to say on how to clean them!
Great article. I don’t think it COULD be explained more clearly and simply. But we’ll stick to tupperwares and various commercial bread bags. We don’t use much foil or plastic wrap.
Just out of curiosity, you said “thoroughly protect your kitchen from the wax”. How’s that working out for all of us here? My beeswax (completely unfairly I’m sure) gets blamed for every sticky spot on the kitchen stove or floor. Except during honey harvest, but at least the honey washes off after you stick to it.
Good day.
I tried to melt some old frames and I got very small amounts of wax and lots of cocoons some other black matter and lots of waste products. Appreciate it if you can shed the light on those substances/materials. How can I maximize the wax extract? Is there a way to benefit from all the cocoons and the other ‘what seems to be’ waste products?
Is the black matter, propolis?
Regards
Hisham
Hisham,
See this post: https://www.honeybeesuite.com/wednesday-word-file-slumgum/
Too much work! ha ha.
Thank you for the detailed instructions! I was given several beeswax wraps for Christmas, and they work beautifully. They are especially appreciated when you can’t find the lid for a container, or one’s container is an odd shape. I wonder if you could use propolis instead of the rosin? When I clean off the screens in my Slovenian bee house, I save all the propolis and have a healthy jar of it waiting for a project.
Deborah,
You could try it, but I find propolis to be sticky and gooey when it’s warm. I have trouble getting it off my hands without alcohol.
Could wax paper be used instead of aluminum foil? My wife has Alzheimer’s. Aluminum has been proven to be bad for Alzheimer’s patients.
Ken,
Use anything you like. It’s just to protect the pan.
I’d recommend parchment in lieu of aluminum foil. Wax paper is tissue paper coated with paraffin, and isn’t made for heat application (it can catch on fire).
If these are less than stellar as food wraps consider making them large enough to wrap a sandwich, for a walk away lunch.
Thanks, great article. I came up with similar method. I use copal rosin vs pine. I also use pinking shears to cut my fabric. Circles work really nicely on bowls, onions, and cabbage. I used plain fabric and write Onion, Cheese etc with a fabric pen for those wraps I only use for a single purpose. I have used warm soapy water to clean mine and not found any problems. I have refreshed the originals which did not use copal resin by reheating and brushing on the mix which I keep in a covered jar, then rebaking the sheet. Slowly all my plastic junk is going away.
Boiling water is too hot. 140ish melts beeswax. Too much drives off volatiles and denatures it. 165F is required to cook food, which can then be allowed to be kept at 145F, so use 170F in your boiler, but keep the beeswax lower. 212F detoxifies botulism, found naturally in honey, but does not kill the spores.
Our family uses large pieces of old sheets to wrap and send homemade fruitcakes, in a fitted lidded can.
I’ll stick with boiling water because it’s much quicker. The wax itself doesn’t reach anything near the boiling point of water, and I remove the mixture as soon as everything is melted.
Real canning jars (which are sold as such, rather than the jars that look like them but are not heat safe) are made to submerge in boiling water and should be fine. I can food, and I’ve never had a jar break in the canning kettle. I use a rack to keep the jars off the bottom of the pot to avoid tempting fate, but I’ve used a folded dish towel with equal success. It provides a barrier from the direct heat and the padding keeps the jars from bouncing around and clanking against the bottom of the pot, which can be nerve-racking.
Another great article. Your research and instruction detail is faultless. You are correct about rosin for stickiness. I have made wraps without it and they don’t seal well. Thank you for sharing.
You could also take up the violin or another stringed instrument. Rosin chunks, molded into neat blocks, are used to make the instrument bow “sticky” enough to catch the strings and make them vibrate. Bowstrings were originally made of horsehair, which you might think is coarse enough to do this on its own, but apparently not. In this community (probably in at least some of the others, too), “rosin” is used as a verb, that is, you don’t “apply rosin to the bow”, you “rosin the bow.”
Did you try some without the rosin and/or oil, or are you relying on others comments as to what happens when you leave them out? I have been tempted by wax wraps as a product to make for sale. A recipe that I’ve been considering simply grates the wax into chips, spreads them out on the cloth, and uses an iron (suitably shielded) to melt them in. Including at least the oil seems like it will produce a smarter product.
I tried everything! My kitchen was a mess for weeks. Without the oil, I found the beeswax cracked and flaked off.
Totally forgot I had even commented on this post. That’s OK, I love going back over old articles and posts when they show up in the “Recent Comments” feed.
I’m planning to actually get around to this soon, so I sprang for some rosin bits last week thru that big online retailer. The funny part is that when I started to look it up, their search engine provided me 8 or 10 possible word/phrase completions, almost all of them having to do with beeswax wraps. Just now when I looked again, to refresh my memory of how funny the list was, they’re all about various stringed instruments – as if rosin for a cello is different than for a violin – but “rosin powder” does yield “for tennis rackets” and “for pointe shoes.” No pole dancers.
Hmm. That’s good to know. I guess.
I’ve been seeing ads for those for a while but was hesitant to spend money on them. Do they ‘stick’ very well? Well enough to put them in a bag in the car and not have the covering fall off?
Dee,
Mine stick really well, but it helps to warm them with your hands when you first put them on.
Great for wrapping cheese!
Rusty,
Dawn Beck from PSBA did her master project on the wraps. It has actually been published and proves they are not all they are cracked up to be. If you haven’t seen it, I thought you would be interested!
BTW, I was an ice skater in 7the grade winning third place in junior women’s free and figure skating. It all ended for me with a cracked tailbone. Can you imagine going to school with a rounded pad to sit on? Embarrassing!!! Now it still pains me where arthritis has crept in. I’m so glad I found bees 20 years ago.
And I do a column for PSBA, where I recommend your site as being one of the very best in the world! Thanks for all you do for us beekeepers.
Thank you, Kathy. Also, sorry about the tailbone!
Great honest and entertaining post, as always! Was looking for oxalic acid dribble recipe and came across this post.
I’m not someone who would buy these (I’m the kind of person who might fall into eating seasonally just because that’s what is on sale and I grow a fair-sized veg garden, but would never pay extra money for organic products) but I made a few of these with my cappings a few years ago.
(Digression: sorry, Rusty, we mostly extract – cannot get hubby to go with comb honey, although I keep a few chunks for myself.) Invaluable for hard cheeses! Great for wrapping bread. I often wrap, then put in a ziplock that I then don’t have to wash out. Good to wrap ripening pears in. I don’t eat a lot of sandwiches, but good for that, too.
I put it over the dough for the first bulk rise but only use plastic wrap for 2nd rise where the dough might touch. They are cute, giftable, but not life-changing.
I didn’t use rosin or oil, just melted the bee-cleaned cappings over some of that cute fabric that I acknowledge I am never going to make a quilt from. So exciting to use stuff you already have around the house to make trendy things that people pay big bucks for!
Cathy,
I too loved using stored, probably-will-never-be-made-into-a-quilt fabric for these. It was fun and I’m still using them.
I love your recipe. Especially your step-by-step ingredient and cooking process is great. I enjoy reading it. I think I will apply this recipe in my kitchen.
Thanks for this post!
Jojoba oil is fairly expensive. Is there a reason you (and every other recipe I’ve seen) use it or could you sun with sunflower oil with the same results?
How many wraps does this amount make?
Thanks!
Andrew
Andrew,
As I said in the post, “Apparently, jojoba has a long shelf life compared to similar vegetable oils and it has natural antibiotic properties, making it the first choice. The runner-up in popularity was coconut oil, so either would work.” I’m sure sunflower oil would work, too, but I don’t know anything about its shelf life or antibiotic properties.
The number of wraps this makes will depend on how large you cut the fabric, the thickness and weave of the fabric, and the temperature of the mixture when you apply it. When it’s hot, it will go on thin, but the viscosity will increase as it gets cooler. So if you want to use less, keep it hot.
My pine rosin is not melting with the bees wax. What am i doing wrong?
I just now found your blog and am LOVING it! In addition to being an inspiring hobby beekeeper, as far as I’m concerned you’re a gifted writer as well. Therefore, I don’t think you need to change your profession to pole dancer…thank god! : – D
Keep the great content coming!
Thanks, I think.